Managing Web Services
Use the Web pane of Server Preferences to turn the Web Server on or off, change the
location of your server’s web homepage, publish custom websites, or turn standard
web services—wikis, web calendars, blogs, and webmail—on or off.
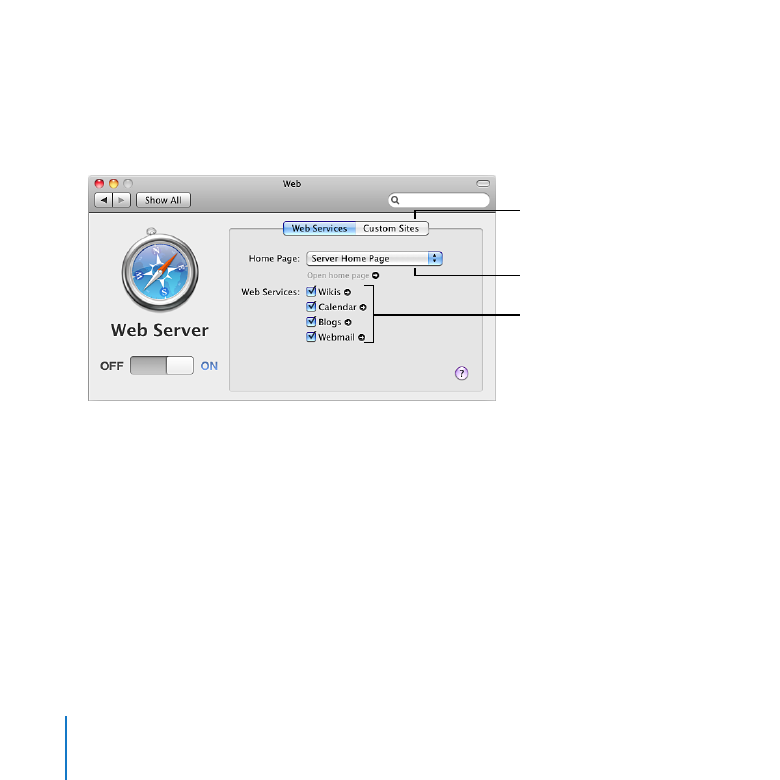
Make all wikis available,
include web calendars in
wikis, let users create blogs,
and let users access email in
a web browser
Add or delete custom
websites
Choose a wiki to be the
server’s website, or use the
default website
About Web Services
Web services can provide wikis, web calendars, blogs, web access to email, and custom
websites.
If web services are on, everyone with a user account on the server gets a convenient
wiki portal, called My Page, for viewing and creating wikis and blogs, using web
calendars, tracking wiki updates, and accessing webmail.

139
Chapter 9
Customizing Services
All users can easily create wikis and control who can view, search, and edit their wiki
content. By using included templates or creating their own, users can add, delete, edit,
and format content naturally—without knowing markup codes or special syntax.
With a few clicks, or by dragging and dropping, they can attach files and images,
publish podcasts, assign keywords, and link to other wiki pages or other websites.
They can also review the wiki’s complete history of changes and revert any page to
a previous version.
Web calendars let people keep track of appointments, meetings, and other events
using any web browser. Users can send and receive invitations to events. When inviting
people to an event, users can see each person’s availability on a timeline. Each user’s
My Page portal includes a personal web calendar, and each wiki can also have a
calendar that everyone who has access to the wiki can use. Users can create multiple
calendars on their personal web calendars and on wiki group calendars that they have
access to. Users with Snow Leopard can also use the iCal application to create, view,
and change events that appear in web calendars.
Blogs give nontechnical users a way to keep their colleagues up-to-date with projects,
files they’re working on, and pictures or podcasts. Users publish their own blogs with
drag-and-drop ease, using a selection of built-in professional templates.
With webmail, users can receive and send mail from a web browser anywhere on the
Internet. They can access all their email as if they were using Mac OS X Mail or another
mail application on their computers.

140
Chapter 9
Customizing Services
Web services also let you publish custom websites that you have created (or someone
has created for you) using website development software. You can restrict access to
each website to a particular group, or restrict parts of the website to particular groups.
You can also specify each website’s IP address, an access port, and the folder where
website files are stored on the server. A custom website is also called a virtual host.
If you want to allow access to web services on the Internet and you have a cable router,
DSL router, or other network router, your router must have port forwarding (port
mapping) configured for web services. If you add custom websites that use access port
numbers other than 80, configure port forwarding for those ports as well. For more
information, see “Protecting a Small Network” on page 35.
If you want to allow access to web services outside your local network and your local
network has a separate firewall device, ask the firewall administrator to open the
firewall for the ports that web services use. If you add custom websites that use access
port numbers other than 80, open the firewall for those ports as well. For a list of ports,
see “Services and Ports” on page 175.
Setting Up Web Services
In Server Preferences, you can use the Web pane to change your server’s web
homepage and to turn standard web services on or off individually.
To configure web services:
1
In the Web pane of Server Preferences, click Web Services.
2
Use the pop-up menu to choose the homepage for your server’s website.

141
Chapter 9
Customizing Services
Choose Server Home Page to use the default Mac OS X Server website or a custom
Â
HTML website you’ve created (or someone has created for you) using website
development software.
Choose a wiki to make it your server’s main website.
Â
If the pop-up menu is dimmed, the Wikis service is off.
If the pop-up menu doesn’t contain wikis, you or someone with a user account on
the server needs to create a wiki.
If you see a “Create the Wiki” button instead of a pop-up menu, the site used for wikis
has been deleted using Server Admin. Click the button to make wikis available.
If you see a Reveal Custom Site button instead of homepage and web services settings,
a custom website has been created using the same DNS name and access port
number as standard web services—wikis, web calendars, blogs, and webmail. Usually
web services use the server’s DNS name (shown in the Information pane of Server
Preferences), and they use port 80. To make standard web services available, click the
button and delete the custom website.
3
Select the services you want to use and deselect the services you don’t want to use.
Wikis: Lets all server users use a web browser to view their My Page wiki portal,
create wikis, and use wikis that they have permission to access. Wiki owners set access
restrictions in the Settings section of their wikis.
Calendar: Adds a calendar to each user’s My Page portal, and allows wiki creators to
include a web calendar in each wiki.
Blogs: Lets all server users create blogs using a web browser.
Webmail: Lets all server users access their mail using a web browser.

142
Chapter 9
Customizing Services
If a service is turned on, clicking the link arrow next to it opens the website for it.
4
If web services are off, click the On/Off switch to turn them on.
If web services are off, wikis, web calendars, blogs, and webmail are unavailable.
Users can visit your server’s homepage at http://myserver.example.com (replacing the
italicized placeholder with your server’s DNS name). There they can click links to see
My Page, wikis, blogs, calendars, and webmail. If your server’s homepage is a private
wiki, visitors must log in using the name and password of a user who has permission
to see the wiki.
Publishing Custom Websites
Besides setting up wikis, you can have your server publish custom websites consisting
of static HTML files. You create a custom website using web development software of
your choice, or have someone do it for you, and copy the website files to your server.
Each custom website is also called a virtual host.

143
Chapter 9
Customizing Services
To publish a custom website:
1
In the Web pane of Server Preferences, click Custom Sites.
2
To add a new website, click the Add (+) button, and then enter the website’s fully
qualified DNS name and optionally choose the folder where the website files are stored
on the server.
Server Preferences creates a website for the DNS name you enter if it isn’t already in
use and your DNS service can resolve it to your server’s IP address.
If you enter a DNS name that’s already being used for standard web services—wikis,
Â
web calendar, blogs, or webmail—you can change the DNS name or specify a
nonstandard access port number. The standard access port for websites is 80.
Before specifying a different port, make sure it doesn’t conflict with another service
provided by your server. For a list of ports Mac OS X Server may use, open Server
Admin (in /Applications/Server/) and use the Help menu to search for “TCP and UDP
port reference.”
If the status indicator to the right of the DNS name is red, Server Preferences can’t
Â
resolve the DNS name to your server’s IP address. To fix this, you can change the DNS
name or click Create anyway and manually set the IP address.
If you don’t choose a folder for the website files, Server Preferences creates one for you
in the default location, /Library/WebServer/Sites/domainname (where domainname is
the DNS name you entered.)
3
Copy the files you want available on the website to the website folder, removing
placeholder files you don’t need.
Make sure your website’s homepage is named index.html or index.php.

144
Chapter 9
Customizing Services
The location of the website folder is shown below the website name in the Custom
Sites pane of the Web pane.
4
Make sure the checkbox next to the website is selected and that web services are on.
If a website’s checkbox is deselected, the website is unavailable.
If web services are off, all custom websites are unavailable.
After adding files and folders to the website folder, you can restrict access to all or part
of a website. For instructions, see “Restricting Access to a Custom Website” on page 144.
Restricting Access to a Custom Website
You can restrict access to each custom website or to folders within the site folder.
You can restrict access to one group that can view the entire website, or restrict access
to individual folders in the website folder. Website folders with restricted access are
called realms.
To control website access:
1
In the Web pane of Server Preferences, click Custom Sites.
2
Select a website in the list, note its folder location, and click the Edit (pencil) button.
3
To designate one group that can access the entire website, choose the group from the
Who Can View This Site pop-up menu.
4
To designate groups that can access folders within the website, choose Customize from
the Who Can View This Site pop-up menu.
You can only control access to folders that exist. You can use the Finder to add folders
to the website folder, whose location you noted in step 2.

145
Chapter 9
Customizing Services